
 |
| Three cherry tomatoes slowly ripen under the New York sun. Photo by Britta Ryley. |
It's springtime, the dream of fresh plump tomatoes, nice basilic leaves and nasturtium flowers assails you, but you live right in the middle of a city. Not a square inch to quench your passion, not even a balcony ! Summer passes, fall is coming, the magic of harvesting has been someone else's dream come true. No problem ! You can always grow vegetables inside you home, all warm and cosy.
I started to write about my own experience in February 2012. I've been explaining that, in the heart of winter, I grew cherry tomatoes in potting soil, but also, I explained how I decided to build myself a Windowfarm. And you can do likewise.
A window-what?
A Windowfarm (TM). It's a simple hydroponic system, installed vertically to take advantage of a window's surface to grow some vegetables, fruits or herbs, instead of non-edible, traditional ornamental plants (though it is also possible to grow them in a system like that).
February 2017 Update :
In December 2016, all activities of the commercial entity designed as Windowfarms have been terminated. Their internet addresses windowfarms.com, windowfarms.org, and mywindowfarm.org has been deactivated. But you can still consult the following sources of informations :
An article on Wikipedia explains the organisation's evolution.
A short article on WikiHow explains how to build the system en 10 steps.
On YouTube, Windowfarms' official channel is still open and their last video is from November 2013. It presents a very impressive system installed in the New York Museum of Natural History.
Their FaceBook page still exists, but their last publication is from March 2016.
A web page has been opened by Canadian citizens who, after having participated in financing Windowfarms commercial entreprise, claim that they have been ripped off.
There are still many Youtube videos on windowfarms, including a construction guide in two episodes, another guide, methodically designed, and a video présenting a very nice technical improvemement to push the water to the top of the system, the T joint.
A British forum has been opened very recently, with new members, very few for the moment. Therefore, the informations are extremely limited up to now.
Let's continue with this article :
Here, I present you with the remaining of the original April 2013 article. I hope you enjoy it !
| Here, Britta Ryley in front of a Windowfarm. She kindly gave me permission to publish some photos for this blog post. |
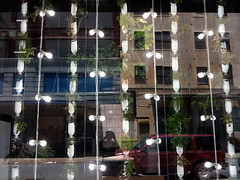
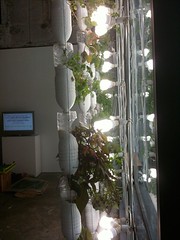
| System designed by the team of Windowfarms.org : recycled plastic bottles, rods or cables for support, silicone tubing, a few hardware parts and a small aquarium air pump. Clay pellets are used to replace the soil, water and liquid nutrient to feed your plants and you're in business. |
A community that has already spread throughout the world, gathered around this good idea and the dream of a healthier life on a less polluted planet.
The aim was to create a space to share their experiences with other indoor gardeners just like you and me, to ask questions or answer them, to find and share more ideas. This is a very stimulating place to go.
The aim was to create a space to share their experiences with other indoor gardeners just like you and me, to ask questions or answer them, to find and share more ideas. This is a very stimulating place to go.
 |
| This hydroponic system is quite aesthetic. Another photo from Windowfarms.org |
On its home page, Windowfarms describes itself as a social entreprise that counts on a volunteer community of research and development (in fact, any person who is willing to experiment this type of culture, try to improve it and share his or her experience with the other members of this community).
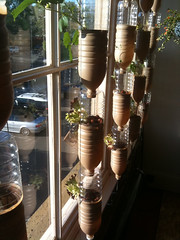
I find this communal organization ingenious, since it allows free diffusion of an unfolding expertise, which is evident in the following photos, representing personalized versions of the original system (note on the 3rd photo below the wine bottle replacing a plastic one, the metal shakers on the 4th and the hollowed gourds on the 5th).


 |
| This system was comercialized in United States. |
Root vegetables (like carrots) cannot grow in such a system either. Regarding fruit crops, I harvested ground cherries and some especially talented - or lucky - windowfarmers succeeded in growing strawberries (these have the reputation of being finicky in this system). I have yet to try it. Big plants are not recommended, first because the pots are too small for their root volume, and second because the plant itself would take all the available window space.
The advantages of a Windowfarm are numerous :
- It uses the window pane in an optimal manner;
- It allows plants to develop with a much smaller root system;
- It often gives healthier plants than it would have a normal soil-filled container;
- It is much lighter than pots full of soil;
- Since it takes advantage of the vertical space, it takes almost no horizontal space;
- Its vegetation becomes dense enough to eliminate the need for curtains;
- There's no soil to make dirty messes.
My first Windowfarm :
 |
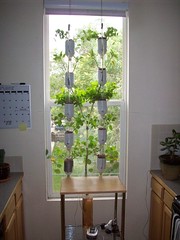
I named this installation "The sailboat".
It bears some modifications to the basic model,the two most important being that there is no electric pump to make water circulate and I put wooden rods horizontally and strings to allow plants to climb. |
In my first installation, which would have been at home in the once very popular TV series "Green Acres" (1965-71), I put 2 cherry tomatoes, 2 climbing beans (a risky business, considering the size of these giants when mature) and 2 nasturtiums. Everyone of them produced in a matter of a few months.
It takes 3 square feet of floor space for the small shelf placed right under the window sill to hold the bottom reservoir for collecting water.
So, I discovered first hand that small varieties of plants are a better choice if you don't want to have to cut them back regularly, because otherwise, the plant won't be able to develop a rootball big enough to feed all those leaves adequately.
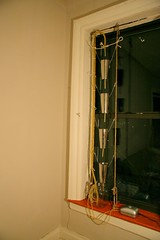
As a replacement for the air pump to push water up to the top of the installation, I put a tank on a high shelf. The water drips from the tank, through a tube controlled by an ajustable valve, down through the system and it ends in a reservoir hidden in a small wooden shelf under the window.
 |
| The water tank sits over a high shelf. A dripping tube runs down to the top of the highest soda bottle. In the first stages of construction, a basin collected the running water just under the third bottle. |
As a replacement for the air pump to push water up to the top of the installation, I put a tank on a high shelf. The water drips from the tank, through a tube controlled by an ajustable valve, down through the system and it ends in a reservoir hidden in a small wooden shelf under the window.
 |
| The same Windowfarm, one month later. By the end of August, vegetation covered the entirety of my window. |
 |
| One of my first beans ! |
A nice suspended garden :
 |
| 18 pots, suspended, plus 4 simply deposited over the upper shelf. They allow me to put 1 to 3 plants per pot in average, for a total of 22 to 66 plants (more if the whole installation contained only watercress, with six plants per pot). There are also 3 orange pots, full of potting soil, in which I planted garlic cloves. |
After my experience with the Sailboat, I wanted to push it a little further, so I decided to use another window, this time facing South.
But since it faces the street as well, I wanted it to be beautiful.
I also wanted to eliminate plastic for health concerns (even though I found no study proving that plastic is nocive for growing food in - in absence of scientific data, opinions that I found were diverging).
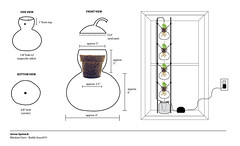
To get to my final design, I had to think. My two main problems were that it was difficult to plug an electric pump on site and that I needed an adequate, durable and aesthetic substitute to the soda pop bottles used in the original model. Then, I stumbled upon these non-porus glazed china pots, equipped with a draining hole in the bottom. This system cost me a lot more, but to me, it worth every penny.
I won't tell you about all my adventures with those two systems, because there has been a few. Some of them had been discouraging ones, like when a serious problem of pH imbalance killed two third of my plants and stunted the other third, stopping their growth for over a month. But on the Windowfarm website, we can read that it takes three full cycles of culture, from seed to harvest, to familiarize yourself with hydroponic culture in such a system. Therefore, I persevered and now, I congratulate myself.
On the other end, over time, I find that my own system bears irritating defects : the type of dripping valve that I have must be ajusted quite regularly, sometimes even daily, or else the water flow may be interrupted, which is very bad for the plants. They can hold on for a time, thanks to the small blocks of rock wool that I put in the pots and that act like small sponges, but right in the middle of a summer heatwave, it's another story. Therefore, I want to try another type of valve. Beside, since some members of the Windowfarm community succeeded in simplifying the electric pump system, out of lazyness and curiosity, I would like to try it on my own Windowfarm.
Here is my list of crops from Mars to the end of September 2011, out of two windows and a total of 6 square feet of floor surface required for two small shelves under each window (I use them to put a few ordinary pots, to store my material and to support the reservoirs that collect water coming from above at the end of each circulation cycle).
Numbers :
Garlic in pots: 22 stems + 6 cloves that came out in much better shape than when I burried them.
 |
| A salad for two in april 2012 : lettuce, basil, beans, green peas, watercress, nasturtium leaves. In the green bowl, the only green coming from outside : young daylily shoots, freshly cut by me. |
And in my two Windowfarms (the Sailboat and the china pots) :
Swiss Chard : 24 leaves
Nasturtiums : 57 flowers, 82 leaves
Ground cherries (Physalis) : 54 fruits
Cucumber : 1
Watercress (minimum length : 6 inches leafy stems) : 70 stems
Climbing beans : 29 pods
Yellow bush beans : 168 pods
Komatsuna lettuce : 94 leaves
Lettuce : 97 leaves
Mint : 40 leaves +
Green peas : 53 pods
Parsley : 7 leafy stems
Cherry tomatoes : 32 fruits
In some periods, it was enough to give us two nice salads a week. All this without any additional source of heat or artificial light. |
| Cherry tomato "Red Robin", a variety reputed to develop into a very small plant and for its capacity to produce fruit with less natural light (I bought the seeds from Semences Solana). In my own experience, this reputation is well earned. Appetizing, no? February 2017 Notice : Semences Solana don't sell this variety of tomato anymore since a few years. My own old plants developped a disease which made their leaves slowly dry up and fall one by one, although the plants still gave some fruits. I discarded them and saved the seeds of a few fruits. The plants from these are also affected in the same way. I must do a second try to be sure, but I believe that this sickness is also transmitable through the seeds (from my diseased plants). If this trial ends up with the same results, I will have to find another dwarf variety as a replacement. |
 |
My Windowfarm at the end of december 2011. We can see my
cherry-tomato (leaning on the window sill), some Komatsuna
(a Japanese green similar to lettuce - look for the big leaves in the
middle of the photo), and watercress (The other pots were
temporarily empty).
|
Nevertheless, let's sum up where I was in February 2012.
I still had my "Red Robin" tomato plant and my watercress. I ripped off my Komatsuna plants, because they turned to seed after one year of loyal services (we harvest the outer leaves, the plant grows up and up, producing more leaves from its inner core).
I seeded green peas, bush beans and another nasturtium.
The number of plants that can cohabit in a single window depends mainly on the size of each plant and the surface of window they will take. For instance, two plants of lettuce won't mind sharing the same pot. Even a third one could fit in, but only two of them will get enough sun.
On the other hand, I could put 6 cuttings of watercress and they shared the tight space without any problem. But to prevent my "Red Robin" from taking too much space, I had to cut it down and I settled to give it all the bottom part of the window. I kept the cuttings though, which was a very good deal, because on top of giving me already fifty cherry tomatoes, my older plant gave me seven new offsprings that I put in ordinary potting soil, under artificial lights. They rooted rapidly and started to produce bunches of fruit.
 |
| My small tomato plant spread its wings ! It took root in the square pot (bottom left) and runned through the whole lenght of the window. |
 |
| I seeded bush beans directly into my pots. Here we see the first young plants, sprouting a week after the seeding. |
February 2017 Update : The references given at the end of the original article are not available anymore. Therefore, I erased them. But my conclusion is still the same :
If you decide to throw yourself in this adventure, I wish you as much fun as I've had !