GardenImages

GardenImages
Our gardens in many lights

mercredi 24 septembre 2014

Are spring bulbs intimidating ?

Cet article en français.

Louise
The very first spring flowering : a snowdrop
bulb. It appears at the end of March or start
of April,  depending on how winter went.
This plant doesn't multiply in my garden
making it especially precious.
Isn't establishing a perennial garden continuously in bloom, from the last snows of spring to the first autumn freeze, one of the gardener's many dreams?


To reach that goal, you automatically have to consider spring bulbs, since they give the earliest flowers of all, plus they are generally quite colorful. However, if you don't think about tulips (most of them blooming in May), we don't often see other spring bulbs species in the garden. 
I always wondered why. Maybe many gardeners who aren't acquainted with these beauties tend to feel intimidated by them. Maybe I'm wrong.

Hélène
On the other hand, maybe it's simply because in fall, this task just doesn't make it to the top of the list considering everything that needs doing in the garden at that time. Maybe the gardener just doesn't feel like gardening anymore especially knowing the hard work's reward will only show 6 months later. It may also feel like a substantial investment - a certain quantity of bulbs is needed to make an impact after all, making for a steep bill when most likely, our gardening money allocation as already been swallowed up.
The Chansonnette Triumph tulip is very tall and keep its huge flower in perfect condition for weeks! Furthermore, it blooms very late (notice how my linden tree as already completely unfurled its leaves). This tulip is part of what I call the "statement plants" here. I positionned the bulbs so a ring would be fashioned around the linden tree.
Louise
Here's a close-up of my crocuses "Ruby Giant"
behind the house. This planting bed is shaded
in summer by many mature trees, but in April,
those trees are still leafless. The crocuses can
enjoy every beam of sunshine all for themelves.
For my own, I can speak of my reticences to plant bulbs, due to my frame of mind at the time. 

I discovered these plants when we bought our first house. The first spring there, nice, long leaves sporting a crisp, refreshing shade of green appeared against the concrete foundation of the house. Followed a cloud of beautiful, vivid yellow crocus flowers: a vision of heaven for my color-starved eyes. Of course, at that time, I was ignorant of their name, let alone the fact that they were bulbs! I couldn't even guess how important these plants were for the spring garden. That was my first obstacle: my own ignorance.

The color palette of spring bulbs can satisfy many tastes since it can encompass vivid and bright colors as well as the most delicate pastels. Here, soft pink Glory-Of-The-Snow (Chionodoxa) grow through a carpet of various ground covers.
One day I came back with a gardening magazine which I bought because of the cover picture, a perfect mound of mixed yellow and purple crocuses.
It was still not enough to compel me to purchase new plant varieties. I wouldn't have dreamed of multiplying the bulbs I already had, scared that I could just kill them between my inexpert hands. Furthermore, how was I supposed to figure out where they were planted, after they had flowered, faded and were nowhere to be seen anymore? Second obstacle: those devilish plants disappear once their foliage browns and dry up.

Once we bought our second house, I was saddened to find out there was not a single crocus in that garden. What a blow! I found my yard seriously laking something. I jumped right back in the books, reading anything and everything that talked about the subject, dreaming about those once-upon-a-time early splashes of spring color amidst the brown vegetation of the beds. During that first winter in our new house, I had subscribed for a perennial plants catalog. Without asking for it, I received their fall edition that presented an impressive amount of bulbs.

This confronted me to yet another obstacle: planting bulbs in fall seemed like an impossible task. How was I supposed to place bulbs in the ground of my already filled-to-the-brim-with-vegetation beds?

Yet, that vivid dream of a colorful spring beconed and with a trowel in my trembling hand, the first bulb was planted, regardless of the fears that assailed me: fear that bulbs and neighboring plants would imped on each other, fear of the chosen location, fear of how many bulbs I could squeeze in a single hole, fear of my inexpertise regarding the dept of the hole, the distance between each bulb, etc. But as each little bag of bulbs emptied itself, the task was becoming easier and easier, my hands were trembling less, my fears were muted.
In Hélène's garden, a ring of daffodils around a tree brings color and gaity. Many varieties multiply by themselves, like these Original Poet's, an heirloom variety.

The following spring, my gardening beds were filled with colorful flowers, way before anything else greened. Here's some tips and tricks I find important that I discovered throughout the years I catered for spring bulbs:

 -When the cat's away, the mice will play. In other words, spring bulbs are plants that benefit tremendously from the vast emptiness that occur in nature during springtime, but this emptiness only lasts a short while. In that season of renewal, everything takes some time to awake and flourish. The spring bulbs, on the contrary, are quick little fellows that grow up, set flower and recharge very rapidly while they have the sunshine, rain and space all for themselves. They even benefit from the undivided attention of pollinators. Then, they disappear, generally before other plants overshadow them and steal their sun and rain. The rest of the year, these bulbs that charm us so much in spring are forgotten, back in dormance.

The more the varieties of bulbs are early, the more the plants are small and close to the ground since they don't have time to grow a lot and accumulate energy before their active life cycle is over. As gardeners, we can benefit from this musical chairs game in nature by placing those early bulbs right where they will be replaced by other plants later on.
 
This is the beginning of April.
Here, I planted my crocuses 

in color patches in a bed near
the sidewalk. They're so early
that they flower before the
grass has even had the time
to turn green !


Same place, mid-May.The 
crocus flowers are gone. We can
see their slender leaves lying
down horizontally. In blue, we
see muscaris. They have a
marvelous perfume. We can
also spot the wide leaf of a
late variety of tulip that will
bloom only in June. In the
background, narcissus are blooming
and when they are done, they'll be
replaced by alliums in July.


To maximize flowerings in a restrained environment, we can plant different bulbs in the same hole. The idea is to regroup species that have different height and even better, different growing time frames, like shown in the 2 pictures above. For example, crocuses bloom at the end of March - beginning of April. On the other end narcissus flower at the end of April - beginning of May, for most of them. Round this group up with late-blooming tulips that come around the end of May - beginning of June and you have a solid block of ongoing flowers right there. Examples of such tulips that would work here are Darwin tulips and parrot tulips. If you're searching for low-growing, late-blooming, muscaris are good, flowering at the end of May - beginning of June.

- It's easier to install bulbs while creating a new garden bed.  You just need to plant that bed in fall instead of spring. It's better to plant the bulbs at the same time as the neighboring plants since nothing is in our way to dig each plant's hole.
Delicate, sky blue Pushkinias, pushing through
a mat of lesser periwinkle (Vinca Minor)

- Spring bulbs can only be disturbed while in their dormancy state. Meaning when their leaves have brown and are dead. So if you have to lift bulbs of the ground, wait for them to flower, then wait for their leaves to turn brown naturally. Those green leaves after the blooming are recharging the bulb with energy for next year's blooming; if you cut them short (in order to moving the bulb or for the esthetism of the thing), you are jeopardizing the plant's capability for future blossoms. If you forethought the placement of your bulbs according to the placement of your other plants, these other plants may be able to grow over your bulbs while these are fading, hiding the bulbs' unsightly browning leaves with their new green leaves. 

Perennials that grow slowly and form a neatly delimited mound are ideal partners for bulbs, since they leave a space around them that's easy to dig for the placement of the bulbs without fear of hacking of vital root systems. Furthermore, if their leaves wait until the end of spring to unfurl, they will hide the unsightly yellowing leaves of the bulbs. For instance, hostas make excellent neighbours to bulbs.

Those bulbs that multiply year after year make poor neighbours to annuals. An annual, by definition, needs to be pulled out and planted back each season. It's easy this way to damage surrounding bulbs that we frankly don't see, either with a shovel or excessive disturbance of the soil, operations that are unavoidable in order to plant annuals. Thus, it's better to restrain from placing these two kinds of plants close together.
Pink and purple yacinth flowers with early, soft yellow tulips at Hélène's. Yacinth is one of those more perfumed flowers. One or two branches are enough to perfume an entire room.

Botanical tulips "Tulipa Tarda" multiply
abondantly in my garden. I bought only 10 bulbs
15 years ago, just enough for one clump.
Now, I have 6 or 8 clumps that conhtinue to 
expand year after year. The only thing I had to do
was to sow the seeds that formed inside the dried
seed capsules that followed after the pollinated
flowers faded.
- To prevent work and cost, it's better to choose bulbs that will multiply. I love the perfume of yacinth flowers and the beauty of parrot tulips, but I never buy any because here, they don't multiply; in fact, they dwindle rapidly to nothing. Yacinths are the worst for me, because even at the wee second year, their flowering is disappointing. It depends where you are of course: at Hélène's, the yacinths multiply. 

As for the summer bulbs like dahlias and gladiolus, they can't survive the winter here. Those will need to be lifted up from the ground, stored and planted back the following spring, a task that can become tedious year after year, but one that could make more sense in an annual garden bed.
Left, 2012. Right, 2013. A visual on multiplication.

On the other hand, there is a multitude of bulbs available that keep multiplying year after year, giving more and more flowers out of bigger and bigger mounds. At my house, crocuses, Scillas, Glories of the Snow and muscaris multiply this way. Daffodils will multiply slowly as well (however, I've noticed them to make a lot of tiny bulbs that take some years before flowering). Garden tulips, from the latin name Tulipa Gesneriana, and who's origin is obscure, have hybrids of all color and form, but most of these hybrids will only produce leaves from their second year onward. Botanical tulips, meaning all tulips except garden tulips, are named thus because - unlike garden tulips - can be retraced to their wild ancestors. They multiply readily if they're happy enough where planted. Here, it's the case of Tulipas Greigii, for example. I also have many mounds of Tulipa Tarda, since I let the plants produce seeds that I take when they're very dry and plant elsewhere. Darwin's tulips come back year after year with such reliability that some catalogues sell them as "perrenials".

It's unfortunate for the hybrids of garden tulips that dwindle even on the second year and onward.
A tiny tulip that was supposed to be blue (I was sold the wrong bulbs) is still a fabulous little specimen: it's earlier than any other in my current possession, a single bulb can produce many flowers and they flower at the same time as this purple Glory of the snow that's growing next to it.

In Louise's garden, botanical tulips "Tulipa Bakeri" growing through that big mound of creeping phlox.

Hélène:
These big pompoms stand 3 feet from the ground on a spindly stalk bring a whimsical touch to the June garden. After a long blooming, these stalks become wondrous magic wands for kids to play with!
Being knowledgeable enough with spring bulbs, I tried my luck with summer bulbs, like decorative onions. Even thought two of them have been eaten by rabbits, the rest made an amazing display. They looked like giant bubbles floating above my garden! Furthermore, these alliums come in many forms, colors and height.

And now, with all these informations and possibilities, will you jump in the adventure of bulbs too?
From a bed of Wormwood (Artemisia Schmidtiana 'Silver Mound'), strawberry and bronze bugle (Ajuga Reptans), grow Alliums. Even the giant hosta is dwarfed by the height of the alliums!


samedi 9 août 2014

Too blue to be true

Cet article en français.

Picture taken at the end of spring: hostas, painted ferns and forget-me-nots.
Hélène :
It's not althoghether absent, but you may have noticed that, in the vegetal world, true blue is quite rare. Forget-me-nots shown in the picture above are a good example of a true cloudless sky blue; borage could also claim to present a real hue of blue (and some other plants too, but I won't try to name them all).

In real life, this centaurea is a little more
purple than blue and its magenta center 
garanties it a good visibility. Cameras
don't always render colors accurately.
I heard somewhere that pollinators have trouble differenciating blue flowers from the sky and so, with evolution, many blue flowers have been put aside due to lack of pollination. Either true or false, my borage delights my bees! But the crux of the problem is that most gardening catalogs parade an impressive number of plants that are supposedly blue - their pictures often followed by a winning slogan saying it's the bluest of all. Like for top models however, pictures of flowers get their fair share or touch ups, especially on color.

This windflower is called a blue anemone and, according to the picture that was used to sell it, I didn't receive the right plant...

It's not only touch-ups that can alter the plant we expect to receive, however. The composition of your soil may also have a hand in the colouring of the flower. For example, some gardens will produce a peach colored flower while it was supposed to come out true pink. When we moved in our present house, there was a blue hydrangea - well, it should have been blue if the plant had been in an acidic soil - however the blooms came out in a sick shade of mauve speckeled with a blue flower here and there.

Louise: In my garden, I have yellow mums that flower extremely late (Chrysanthemum rubellum "Mary Stoker") and they do have that tendancy to shift hue. I saw some with a wonderful shade of pinkish yellow in some neighbours' yards.

In my own yard, they have distinct shades. Those planted near a wooden half-barrel belted with rusted metal are a beautiful burned-orange shade. Maybe the rusted metal saturated the soil with iron and just maybe the plant absorbed that in its tissues. With time, that plant became extremely big and sent shoots. The new growth as distanced itself from the wooden barrel. As a result, the flowers arbor 3 distinct shades with the furthest flowers showing a school-bus-yellow tint when mature.

All in all, if you buy plants from catalogs according to their pictures - and even if you can see them in person before you buy them - sometimes you will have quite a surprise when the plant is settled at your abode...
Mary Stoker mums (Chrysanthemum Rubellum) have a beautiful daisy shape. They flower later than other mum varieties and are so resistant to cold spells that they will last many a night under zero and can even withstand a few snowdrafts. The young flowers are pale yellow (look at the one further back) and change to a pretty rosy-yellow when they mature. But as we stated in this article, they really can vary shade depending on their position. Emerging through this mums bouquet, the brown balls on stems are the seeds of my rudbeckies hirta. At the foot of all that, there's sedum (Sedum Spectabilis).


dimanche 20 juillet 2014

The Stubborn Sunflower

Cet article en français.


Hélène:
5:00. In the morning. Since my insomnia has been lasting for the past 2 hours, I slip out of bed and outside on my back porch, in a dressing gown. Outside, the sunrise is fantastic and birds chirp their tiny heart out. Who said that living in a suburb of Montreal didn't equal having a wide variety of fauna? Because the birds - from their different calls - are plentiful and varied here. But I don't recognize them. I never learned to differentiate them (someday, maybe!).

I sit down in one of my lawn chairs and enjoy the garden. That's one reason it's there after all. For relaxation and meditation. This morning is quite nice, actually. Not a cloud in the sky, it's warm enough, the joyful bird songs fill my ears, my cat Buttercup is sleeping not too far from me and... there's a sunflower snubbing me?

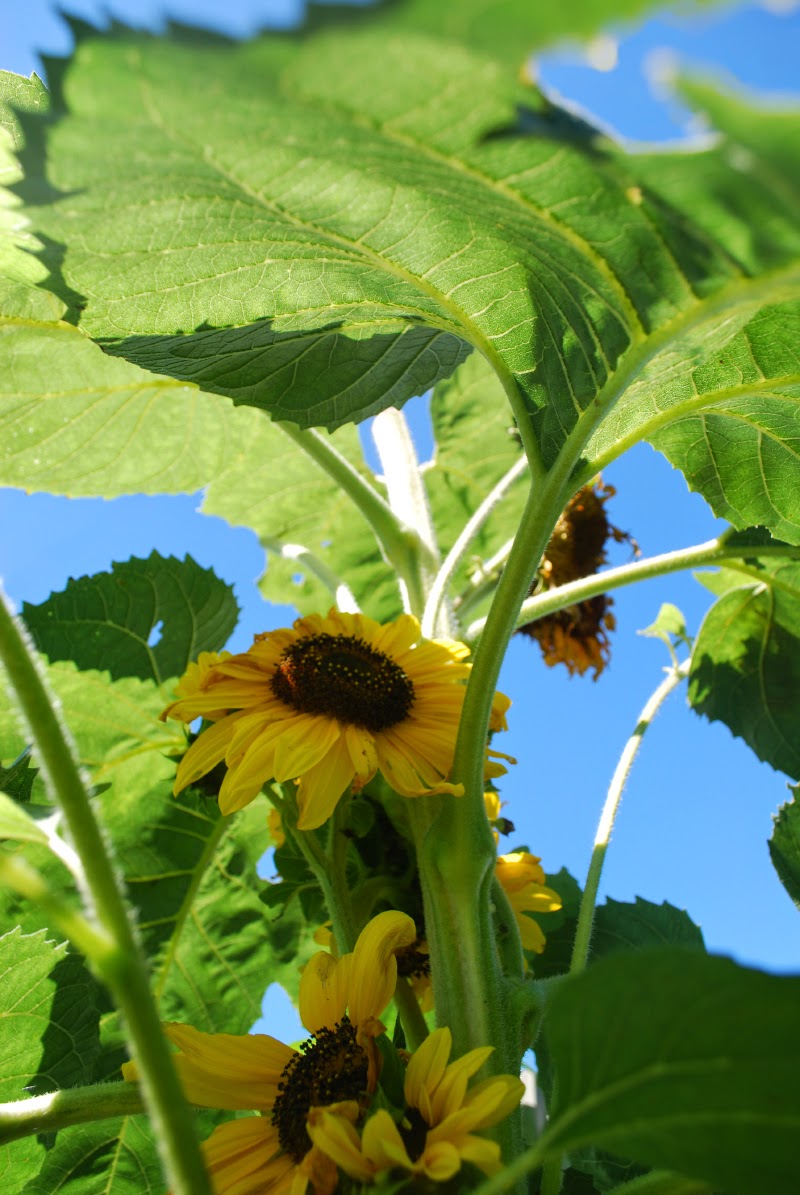
I frown and watch, it (the only one), with the head stubbornly turned toward the hedge, like a school kid that's been punished and sent to the corner of the classroom. By Jove, he's just missing the hat ! What are you doing, sunflower? That's North!


 So what's heliotropism?
According to Wikipedia, it's "the diurnal or seasonal motion of plant parts in response to the direction of the sun". It's the attraction to the sun or just the light of it and the first example that generally comes to mind - beside grandparents going to Florida, is the sunflower. Alright. So what is it doing, that sunflower, watching the North?

Well, supposedly in the morning, the position may vary. But once the sun is up, the sunflower will turn toward it and follow it due west, where the sun sets. That's the theory.

Why am I telling you all that?
Because it's not the first time that I notice sunflower heads that are growing here not doing that. In fact, each one tend to look in a different direction and move but very little. And beside that specific sunflower that's looking at the hedge with verve, in all my 6 years in this specific garden, I've never noticed a sunflower following the sun with clockwork precision.

The variety of the stubborn sunflower mentionned above is either Giganteus, or Early Russian; either way, the subject of this article promises clearly multiple flower heads on that one stalk, the big one already there being followed by 2 to 4 smaller heads. In such a case, which flower should follow the sun anyway?
Here's an example dated back to 2011
of a multi-headed sunflower.
Well, the trap is in the name. We assume that the flower is supposed to follow the sun. But why should it? The head doesn't do photosynthesis, after all. And that's where, if we zero on the definition and understand it thoroughly, we understand: "the diurnal or seasonal motion of plant parts". And what parts of this fabulous plant would have the most reason to follow the sun to maximize its energy? The leaves, of course! Watch again the picture of the sunflower snubbing me (the second one in this article), taken around 5:30 - 6:00 in the morning. Here's also a picture taken at the same time but under the leaves. They show that they are indeed pointing toward the sunlight coming from the East.

Here's a similar picture of the one at the top of the article, but taken at 9:00 at night.

The head barely moved (the result of the stalk that leaned toward the West throughout the day), but the leaves - those of the plant with a flower and those of plants around that don't yet have their flowers - are now oriented West and low while in the morning they were high and oriented East.

So that's that. I didn't manage to get back to bed that morning but I learned a bit more about this giant of the garden.

Louise :
Helene's research et observations have been a revelation for me. I too, have noticed that my sunflowers didn't do what I was expecting. But it never came to mind to question this "knowledge" about the flower following the sun. Sometimes, we take for granted common knowledge to the  point of dismissing our own experience. This is a lesson for me!
This really looks like a rock band, with the singer showing its back while the dancers play their number for the audience...

jeudi 26 juin 2014

Regarding rhubarb, there's a question of creativity

Cet article en français.

There's a time in the garden where flowers are scarsely present and don't have much height either. Rhubarb is an exception and as such can be embraced to offer tall, flowery stalks (up to 120cm, 4 feet) that give a punch to an otherwise subdued landscape.  Most sources claim it's better to not let a rhubarb plant flower,in order for the plant to conserve its energy for the production of the leaves and stalks. But since I have plenty of plantake care of our personal needs, letting them flower is not a problem here. This picture here shows the flowers waining.

Hélène:
Too sour for my taste and dipped in sugar, I find it too crunchy. Rhubarb seems limited in its the culinary uses. But after some research and tryouts, here's a couple of ideas that may spark your curiosity. 

First of, rhubarb jam is easy to make and delicious to eat, however it requires a long time to cook in order to get all the water out of it. Everything is a question of personal taste, of course, but for most people, it also requires a lot of sugar.


Here's a small tip: When I cook my rhubarb jam, I add water (and sugar of course) and when the pieces of stalk start to fall apart (after about 20 minutes), I separate liquid from pulp with a sieve. The liquid is a beautiful coral or even ruby color (if I add strawberries to the mix). Put back the juice on the stove to bring it to the  consistency of a syrup and you have there a wonderful base for a rhubarb soda. Some will say that taking the water out of the jam this way will take part of its flavor from it as well; Louise finds that the jam actually becomes less astringent, but on my part, I haven't found any noticeable difference. To each his own, I guess.

On the left, rhubarb and strawberry syrup with a jam of similar makings. On the right, rhubarb syrup and a glass of rhubarb soda (from last year, a mix of half syrup, half mineral water).
There's more to do with rhubarb, of course: from a delicious rhubarb cake found in this fabulous book, (in French, still available at Renaud-Bray), to the marvelous  rhubarb and strawberry croustade from the amazing Martine (the recipe is also in her book that I highly recommend! Again in French), there's clearly more to rhubarb than that sugar-coated, cristallized stalk!

 Note: The complete recipe for the rhubarb syrup comes from this book (in English this time), a book I have recommended elsewhere on the blog, if I'm not mistaken. Rhubarb syrup can be frozen directly in a bottle and doesn't change volume too much because of it's high ratio of sugar.

Louise : 

A substitute to lemon juice:
I was surprised and happy to learn, some years ago, that rhubarb juice can be used in place of lemon juice in some recipes. Since lemon juice always seems to spoil here at home (I don't use it fast enough), I now freeze my rhubarb juice that would suffer the same fate otherwise. Of course, I could have done the same with lemon juice years ago!
My first batch of rhubarb juice was done by pure chance: Once, I was unfreezing pieces of rhubarb when I noticed a lot of the juice had separated from the stalk pieces. I kept it, freezing half of it right back and trying the rest on a recipe that called for lemon juice. The results being conclusive, I adopted the rhubarb juice as part of my culinary arsenal.

Subsequently, I used a juice extractor. I used small pieces of rhubarb to prevent filaments from getting stuck in the blades, but my extractor now broken, I resorted to the easiest method available.


Four big rhubarb stalks and a quarter
cup of water gives me back a cup 
of unsweetened rhubarb juice and the
same volume of  jam. When you take
out the juice this way, less sugar is

needed to sweeten the pulp.
Rhubarb contains a lot of vitamin C.
I use Hélène's rhubarb jam recipe, but with four variations. First, I don't add any sugar. Then, I add just enough water to cover the bottom of my pot. I also cover it during all the cooking time, in order to keep the steam in. Using a sieve to separate it from the pulp, just like Hélène does, I obtain an unsweetened, almost non diluted juice that I don't filter furthermore and that is sufficiently acid to be used as a substitute to lemon juice.

Finally, I sweeten the remaining pulp with some sugar or maple syrup and I put it back on the stove for a few more minutes of cooking.


I do freeze my rhubarb juice in small portions of 20 mL (4 teaspoons), making it easier to use. I guess it could be frozen in ice trays, but I reuse small medicine bottles instead. I nput these small bottles in a larger container and voilà! I have a good stock of rhubarb juice ready to use until the following spring.

There's something incredibly gratifying in producing at home something that replaces an "exotic" produce such as lemon. And my rhubarb juice is completely bio, too! 

Let's talk about the culture of the plant:

We can harvest the stalks of a two year old plant, if that plant was a cutting from another. The usual wisdom is not to harvest more than two thirds of the stalks, but a second harvest is doable around September.  These plants will be at the top of their game for the next 5 to 10 years. After that, harvest may dwindle but rhubarb plants can still produce at the robust age of 50 years, sometimes even a century according to Wikipedia!

A mature rhubarb plant (around 3 years old) can produce flowering stalks. It is said that older varieties have a stronger tendancy to do this compared to recent varieties.
It's possible to produce plants from seeds, but according to some sources, it's apparently harder under our latitudes. There's plenty of informations on the net for folks who want to try this. Of course, the plants started this way will be too small for a first harvest on the second year.
A flowering stalk in seed.
 Since I let my plants flower, I harvest them only after the flowering period to reduce stress on them. Cutting the stalks and leaves (poisonous leaves, so beware) exposes the ground, so I use the humongous leaves as a mulch to protect it. They decompose fast, releasing nutriments such as potash and phosphorus, but they seem to do a good job of smothering weeds, maybe because of their toxicity. I also add compost or manure and I put more mulch in the form of dead leaves from past falls.

The small and new leaves of a rhubarb plant growing in April!

lundi 5 mai 2014

No need to boil our maple sap to use it

Cet article en français.
Este artículo en español.

Louise :
Spring's finally here; we have a tenant to prove it too!
Our new tenant, the proverbial groundhog, established residency under the garden shed. We can see it bask in the sunshine, between the rainwater barrel and the wheelbarrow.
After a winter seasonned by two ice storms; a winter that was cold and seemingly unending, the maple syrup harvest started slowly and only at the beginning of April; not surprising, considering the month's weather. A mediocre production to booth, but it's always educational to have such hardships. First of all, an unexpected happenstance made us reconsider the way we boil our syrup and in the end, we learned how to appreciate maple sap in many other ways. Finally, we filtered our product for the first time.

The unforseen : 
Here's the look of the oven's top
after about 6 hours of cooking on

medium to high temperatures
(and before any attempts of scrubbing).
Last year we were shocked to find out that whatever we boiled on our stove had the unfortunate effect of premature wear on it, since it's a new appliance. Thus, I have to warn you of this possibility in your own kitchen. 

First and foremost, for many years we boiled maple syrup on our old stove without any itch. It was a 60's oven, made to last.

With this new oven, a low end model in white enamel, it's just not the same. With only a few years under its belt, it's becoming harder and harder to clean the thing. Making those tiny droplets of caramelized syrup disappear requires a good scrub, something the oven doesn't appreciate. Indeed, the white enamel is not of good quality and tend to scratch easily. Dirt lodges in those scratches and is hard to dislodge. 

I feel that we needed to speak of it on this blog, to warn readers. So how could we change our boiling technique to prevent this problem? There are a couple of alternative methods that I will present you further down this post, but the easiest solution is also the most obvious: use maple sap directly.

Ah! Divine maple juice!

What to do with all this sap? Drinking it, of course, is delicious. It's filled with loads of nutriments, floating in the sap. It can be kept a couple of days in the fridge. It nicely replaces your morning glass of juice and is very quenching. Small note: drink it in moderation to make sure it doesn't have an adverse effect on yourself. Some people have a tendancy to suffer diarrhea after drinking maple sap. As for me, no effect at all. Nope!  I could drink this stuff all day long.
It's also possible to freeze maple sap for future use. But it's useful to be aware that while freezing, the nutriments and sugars separate from the water and are the last to freeze. When unfreezing, it is the opposite, solid elements will thaw first. Thus, if you want a very sugary sap, don't wait for the entire bottle to thaw. Of course, this means that the remaining block of ice will mostly be water.
If you'd rather have the same amount of sugars as before freezing the bottle, let it thaw completely before pouring yourself a drink.
I reused plastic juice bottles to freeze my sap. Note the ice is whiter at the top of the bottle; this isn't a light effect, it's the sugars and nutriments that have gone up while the water was freezing.
This year then, we froze our maple sap for the very first time. It's easy to do, and because of the relatively high amount of sugar (3 to 5%), the maple sap doesn't expand all that much when frozen. I imagine it is similar with the sap from black maples, a species that produces a sap with similar sugar contents, but maybe it is different with other species of maples because they have less sugar content.
The maple sap is filtered before being put in the freezer. I discovered that a bottle almost three quarters full can be frozen without any spill. We just put it in the freezer without its cap for an hour or two. Once the content is frozen solid, the bottle is filled to the brim.
At this point, if you touch the surface of the ice, it will feel soft and sticky. Taste it: It's very sweet. Just screw the cap back on the bottle and voilà ! 

The separation that occurs between the sugar and water contents during the freezing process brought some researchers from Laval University to work on a way (this article is in French) to produce maple syrup from maple sap by successive freezings, the idea being to take the frozen water out of the sap as it's forming, since that frozen water contains very little of the maple sugar needed to do the syrup.

Remember that only one tap from a tree can produce up to 40 liters of sap, during the good years of course. So, depending how much you can store in your freezer, you may be set for a good while.

Why not use maple sap in cooking?

So we can use maple sap like fruit juice. My husband and I drank about twenty liters already this year and gave some to friends and family.  But it has many other tasty applications: added to drinks or as an ingredient in recipes, for example.
At the suggestion of a reader, Isabel, I used the sap to replace water or other liquids in a variety of soups: carrot, squash, even chicken, noodle and corn. I still have to try it in a turnip soup! I used the sap in smoothies, in cakes and cake frosting. I cooked meat  stews and ham in it. I deglazed my steaks with it. There are so many ways to use this tasty liquid !
Recently, producers made it possible throughout the year to buy maple sap in grocery stores. It can be used as such or you can boil it. The link above gives many recipes using small quantities of maple sap. Up to you to experiment with it. All of this also points to the fact that you could harvest maple sap even if you don't plan on boiling it down to a syrup.

As for the syrup itself, my friend Carmen told me she saw on the internet a spring detox with maple syrup, lemon juice and cayenne pepper. I searched and rapidly found this recipe. I haven't tried it myself, but I still point it out in case you are interested.

Regarding other ways to boil maple syrup, here are other solutions:

First off, if you aren't too much in a hurry, a wood stove is very good to slowly evaporate maple sap. We don't have one in our house, however.

Our first new method was with the aforementionned electric stove, but boiling the sap on low instead of medium-high. There's less droplets that way and thus, less caramelization on the stove itself. It works well, but if you have a lot of maple water to go through, it's not ideal since the process takes a lot longer.

An acquaintance of my sister said his parents used to put a big pot of maple sap to simmer for an entire night, before going to bed. The morning after, most of the evaporation was done with and they ended up with a thicker liquid ready to be boiled down to syrup. We used that method but only in daytime, while we can keep an eye on it, for safety reasons. It's efficient, not as hard on the appliance, less demanding from us since we don't feel obligated to stick around the pot at every moment and the heat being not as intense, it contributes to the heating of the house in a more uniform manner.

The second method we tried this year: the use of the BBQ or a portable cooker - both using propane gas. Someone lend us a portable cooking burner similar to this one. In good conditions, it's efficient but not at all economical. Furthermore, we had to place it in a sheltered spot because of the wind and the cold. In our experience, the maple syrup produced that way cost at least as much as the one sold at the grocery store.

The third method we haven't tried yet: In our garden shed, we have a wood stove. No chance this year: Our wood normally attributed to this stove was used for another project. We are used to collect free wood from our own yard - dead wood from the nice amount of trees we own - so buying a wood cord was out of the question.

The fourth method: building a rocket stove, a small outside stove that creates a lot of heat with a small amount of wood, mostly small branches and wood scraps. You can't burn a log in that kind of oven.
A rocket stove is very economic, easy to build and disassemble, but you have to respect the optimal proportions for the chimney and hearth if you want it as efficient and smoke-free as possible. It means you can't use any kind of bricks or cement blocks. Our prototype made smoke, which means the stove wasn't burning the combustion gases and so, it wasn't producing as much heat as it could have (while creating some pollution too). The sap evaporation was thus going slowly, like on a normal wood stove. Our design needs to be tweaked and I'll talk about it more at a later time.

Finally, thank you Glenn, for your suggestion in a comment dating 21 april 2014 (link in French to our previous article about maple syrup). If I find one of these old crock pots from the 70s, I'll try it!


Long live filters!
 This year, my husband bought a sheet of white felt used to filter maple syrup. It was bought in a specialty store for maple syrup production equipments. We used a square of small dimension that fitted on a funnel.
We doubled it with a coffee filter that caught the biggest particles.
Then, we poured the boiling syrup slowly through both filters. As time passed, the filters were filled with solid particles and the syrup was getting colder and colder which slowed down the filtration process, so much so the first cups of syrup were filtered in minutes while the rest took a couple of hours. It's an endeavour that requires patience to say the least.
But the result was worth it since this process eliminated the deposits at the bottom of the jars.
I recently learned that this deposit comes from the maple sap itself. It's made of the minerals that are naturally present in the sap. During the evaporation process, these minerals crystallize and end up at the bottom of the syrup. The syrup is thus absolutely edible even if there's a deposit.

Next time, we plan on filtering our produce before it becomes a syrup: just when it's somewhat thick, so we can filter it faster and then start the evaporation process again until it becomes a syrup. This way, we could pour the boiling syrup in our jars in order to seal the covers. 
Pure, filtered maple syrup.